 Linux常用命令
# 查询包含指定内容的文件
例
查询当前目录下的所有文件是否有包含match文本内容
grep -r "match" ./
# 压缩文件/文件夹命令
压缩文件
zip file.conf.zip  file.conf
压缩文件夹
zip -r file_backup.zip   .   点表示当前目录
解压文件
unzip file.conf.zip
解压文件到指定目录
unzip file.conf.zip -d  /data/bak
2
3
4
5
6
7
8
解压:[*******]$ tar zxvf FileName.tar.gz
压缩:[*******]$ tar zcvf FileName.tar.gz DirName
2
# scp传输文件
scp -P 22 openresty.tar root@192.168.122.32:/data
# grep
历史筛选关键字(eg:yum)
history |grep 'yum'
2
# 清理缓存
查看缓存的命令
  free -m
清理缓存的命令
     echo 1 > /proc/sys/vm/drop_caches
          echo 2 > /proc/sys/vm/drop_caches
          echo 3 > /proc/sys/vm/drop_caches
2
3
4
5
6
# 查看当前目录下所有文件大小
du -sh * | sort -n
# 查找文件
find / -name 'wenben.txt'
# 查看cpu核数
cat /proc/cpuinfo | grep "cpu cores" | uniq
# 查看处理器
cat /proc/cpuinfo | grep name | cut -f2 -d: | uniq -c
# 查看操作系统
cat /etc/redhat-release
# 替换文本内容
把当前目录下docker-compose.yml文件所有192.168.50.68内容替换成192.168.50.12
sed -i 's/192.168.50.68/192.168.50.12/g' docker-compose.yml
当替换的内容存在/关键字时使用#替换原来/
例如。把/data/test1替换成/view
sed -i 's#/data/test1#/view#g' docker-compose.yml
若要替换变量,则使用双引号
sed -i "s/kudemo/${serviceName}/g" ${serviceName}.yaml
# 测试服务器之间网络带宽
# 监测服务器之间网络带宽
从官网下载相应版本。
https://iperf.fr/iperf-download.php
centos7 安装

rpm -i iperf3-3.1.3-1.fc24.x86_64.rpm

ubuntu18.04安装

sudo dpkg -i libiperf0_3.1.3-1_amd64.deb iperf3_3.1.3-1_amd64.deb
-----------------------------------------------------------------------
使用
服务端:iperf3 -s

客户端:iperf3 -c 10.0.3.147 -n 1000000
2
3
4
5
6
7
8
9
10
11
12
13
14
# 监测进入本机流量峰值
脚本
链接:https://pan.baidu.com/s/16tzr3soYk6-uDP4XsaQ1Lg
提取码:kc4q
2
命令执行 ./network-analysis.sh
# 测试IO性能
测试方法: a.测试磁盘的IO写速度
time dd if=/dev/zero of=test.dbf bs=8k count=300000
如果要测试实际速度 还要在末尾加上 oflag=direct测到的才是真实的IO速度 b.测试磁盘的IO读速度
dd if=test.dbf bs=8k count=300000 of=/dev/null
每次写入/读取8k的数据,执行300000次
dd命令可以通用,但不够专业,也没有考虑到缓存和物理读的区分,测试的数据也是仅作参考,不能算是权威。不是一个专业的测试工具,不过如果对于测试结果的要求不是很苛刻的话,平时可以使用来对磁盘的读写速度作一个简单的评估
# 安装vnc远程联接linux
yum -y install tigervnc-server.x86_64
启动vnc(:9 == 5909)
vncserver :9
vncserver -kill :9
2
3
4
# systemctl命令
1.启动nfs服务

systemctl start nfs-server.service
2.设置开机自启动

systemctl enable nfs-server.service
3.停止开机自启动

systemctl disable nfs-server.service
4.查看服务当前状态

systemctl status nfs-server.service
5.重新启动某服务

systemctl restart nfs-server.service
6.查看所有已启动的服务

systemctl list -units --type=service
2
3
4
5
6
7
8
9
10
11
12
13
14
15
16
17
18
# 后台执行脚本
setsid ./test.sh &
# 下载需要的rpm软件包
#离线环境,提前在有网络的服务器上下载好需要的软件包
yum -y install nfs-utils --downloadonly --downloaddir /home/nfs
2
# 个性化login信息
修改以下脚本可修改login时的系统提示文本。
cd /etc/update-motd.d
ll
total 20
drwxr-xr-x  2 root root 4096 Nov 11 02:16 ./
drwxr-xr-x 99 root root 4096 Nov  8 02:31 ../
-rwxr-xr-x  1 root root 1220 Nov 11 02:09 00-header*
-rwxr-xr-x  1 root root 1478 Nov 11 02:16 10-help-text*
-rwxr-xr-x  1 root root 1158 Apr 19  2012 99-footer*
2
3
4
5
6
7
8
header文件提供了头部的显示信息,默认为操作的系统的版本等信息。
help-text显示的为主要的文本信息,里面可以包括一些警告等。
footer为文件结尾。
以上均为shell脚本。可以修改后下次一个新的session请求过来后生效。
# swap交换空间
(1)创建分区1G大小文件:dd if=/dev/zero of=/swapfile bs=1k count=1024000。
(2)使用 mkswap 命令来设置交换分区
mkswap /swapfile。
启用交换分区
(3)swapon /swapfile。
(4)如果需要每次系统重启后自动挂载交换分区,就需要修改/etc/fstab文件,新增内容:/swapfile swap swap defaults 0 0。由于我们只是本次编译到用,所以不设置。
(5)编译完成后,关闭交换分区:swapoff /swapfile。
(6)删除交换分区:rm /swapfile。
2
3
4
5
6
7
8
# 修改ssh默认22端口
vim /etc/ssh/sshd_config
按i进入编辑模式,把#Port 22 修改成 Port 及对应端口号。如 Port 22001。改好后按esc,再输入:wq保存)
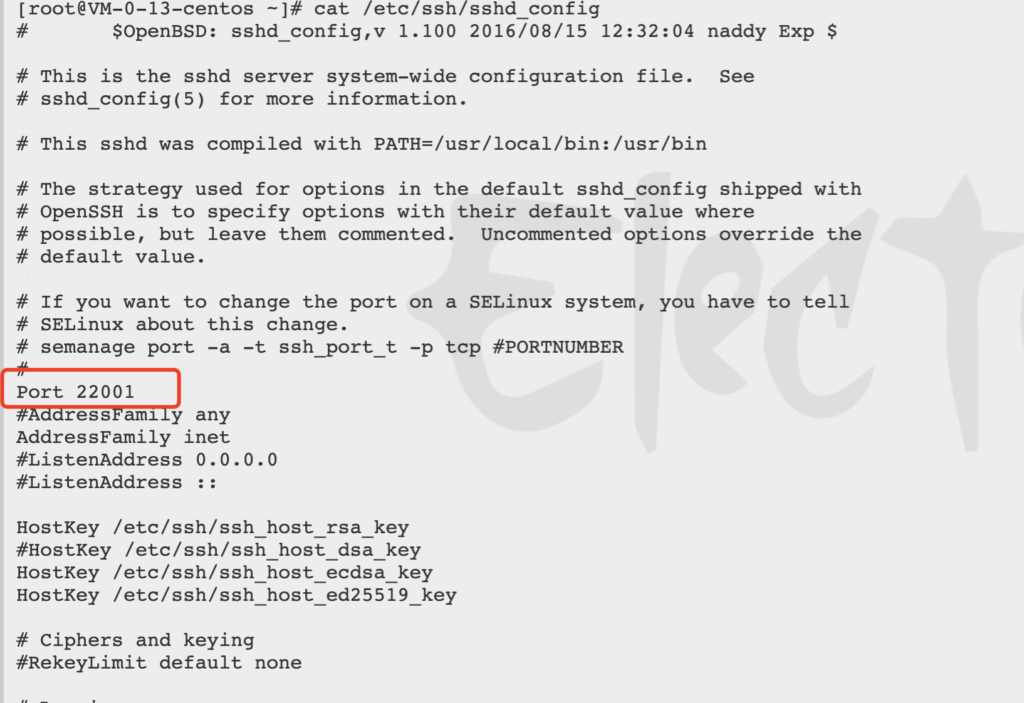
service sshd restart
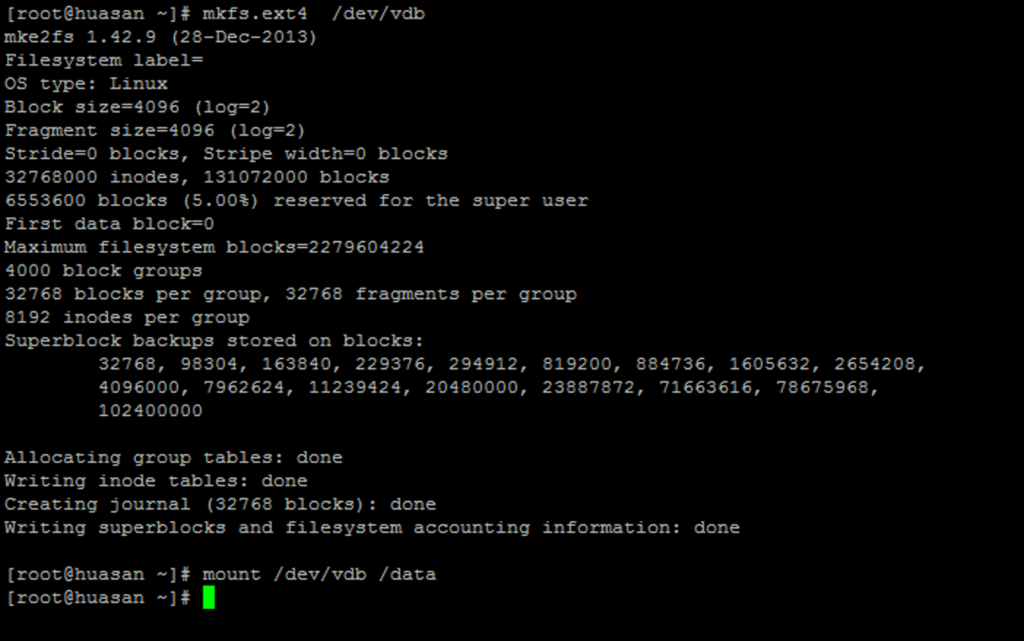
# 挂载磁盘
挂载磁盘时候遇到: mount: /dev/vdb is write-protected, mounting read-only

需要格式化磁盘(不是刚分区的磁盘慎用,防止格式化)
mkfs.ext4 /dev/vdb
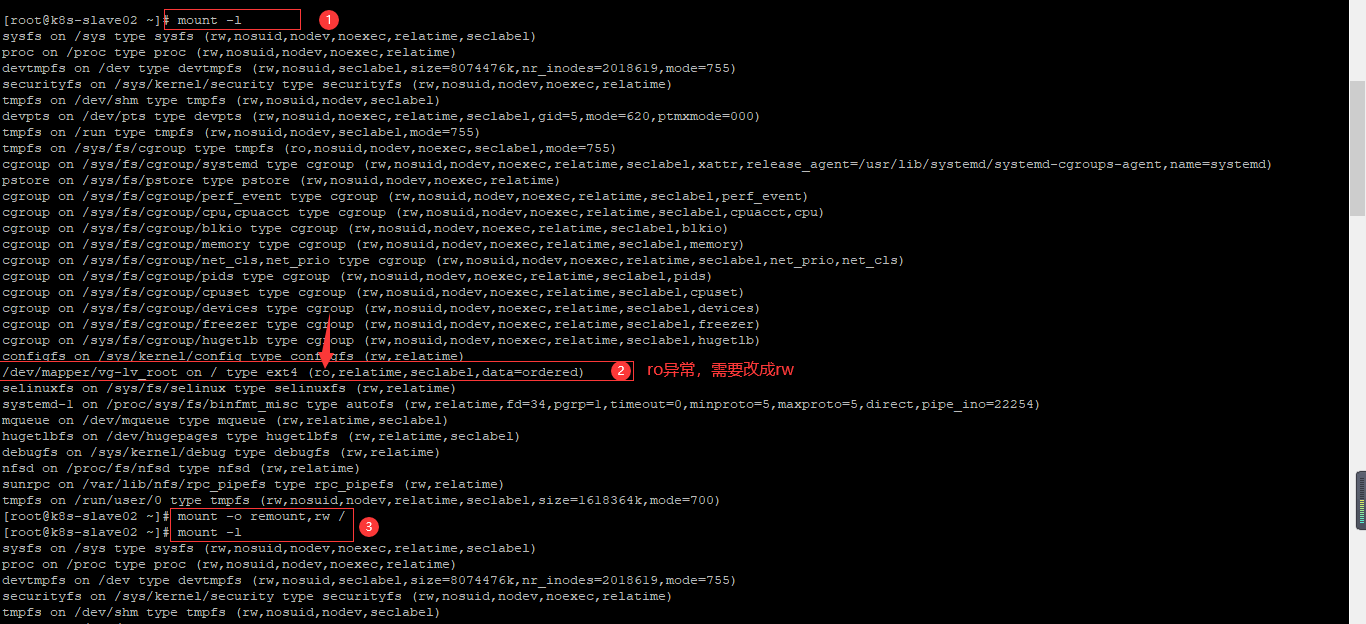
# 服务器重启异常问题
Read-only file system
问题描述:cd / 然后按tab键出现错误

mount 查看所有挂载,发现根目录的挂载权限是ro只读
/dev/mapper/vg-lv_root on / type ext4 (ro,relatime,seclabel,data=ordered)
执行命令
mount -o remount,rw /
就正常了
操作截图:
# linux代理
# 服务端(拥有外网权限)
# squid.conf
cat /etc/squid/squid.conf
  #
# Recommended minimum configuration:
#

# Example rule allowing access from your local networks.
# Adapt to list your (internal) IP networks from where browsing
# should be allowed
acl localnet src 10.0.0.0/8     # RFC1918 possible internal network
acl localnet src 172.16.0.0/12  # RFC1918 possible internal network
acl localnet src 192.168.0.0/16 # RFC1918 possible internal network
acl localnet src fc00::/7       # RFC 4193 local private network range
acl localnet src fe80::/10      # RFC 4291 link-local (directly plugged) machines

acl SSL_ports port 443
acl Safe_ports port 80          # http
acl Safe_ports port 21          # ftp
acl Safe_ports port 443         # https
acl Safe_ports port 70          # gopher
acl Safe_ports port 210         # wais
acl Safe_ports port 1025-65535  # unregistered ports
acl Safe_ports port 280         # http-mgmt
acl Safe_ports port 488         # gss-http
acl Safe_ports port 591         # filemaker
acl Safe_ports port 777         # multiling http
acl CONNECT method CONNECT

#
# Recommended minimum Access Permission configuration:
#
# Deny requests to certain unsafe ports
http_access deny !Safe_ports

# Deny CONNECT to other than secure SSL ports
http_access deny CONNECT !SSL_ports

# Only allow cachemgr access from localhost
http_access allow localhost manager
http_access deny manager

# We strongly recommend the following be uncommented to protect innocent
# web applications running on the proxy server who think the only
# one who can access services on "localhost" is a local user
#http_access deny to_localhost

#
# INSERT YOUR OWN RULE(S) HERE TO ALLOW ACCESS FROM YOUR CLIENTS
#

# Example rule allowing access from your local networks.
# Adapt localnet in the ACL section to list your (internal) IP networks
# from where browsing should be allowed
http_access allow localnet
http_access allow localhost

# And finally deny all other access to this proxy
# http_access deny all
http_access allow all

# Squid normally listens to port 3128
http_port 3128

# Uncomment and adjust the following to add a disk cache directory.
#cache_dir ufs /var/spool/squid 100 16 256

# Leave coredumps in the first cache dir
coredump_dir /var/spool/squid


#
# Add any of your own refresh_pattern entries above these.
#
refresh_pattern ^ftp:           1440    20%     10080
refresh_pattern ^gopher:        1440    0%      1440
refresh_pattern -i (/cgi-bin/|\?) 0     0%      0
refresh_pattern .               0       20%     4320
2
3
4
5
6
7
8
9
10
11
12
13
14
15
16
17
18
19
20
21
22
23
24
25
26
27
28
29
30
31
32
33
34
35
36
37
38
39
40
41
42
43
44
45
46
47
48
49
50
51
52
53
54
55
56
57
58
59
60
61
62
63
64
65
66
67
68
69
70
71
72
73
74
75
# squid.conf
cat /etc/httpd/conf.d/squid.conf
 #
# Recommended minimum configuration:
#

# Example rule allowing access from your local networks.
# Adapt to list your (internal) IP networks from where browsing
# should be allowed
acl localnet src 10.0.0.0/8     # RFC1918 possible internal network
acl localnet src 172.16.0.0/12  # RFC1918 possible internal network
acl localnet src 192.168.0.0/16 # RFC1918 possible internal network
acl localnet src fc00::/7       # RFC 4193 local private network range
acl localnet src fe80::/10      # RFC 4291 link-local (directly plugged) machines

acl SSL_ports port 443
acl Safe_ports port 80          # http
acl Safe_ports port 21          # ftp
acl Safe_ports port 443         # https
acl Safe_ports port 70          # gopher
acl Safe_ports port 210         # wais
acl Safe_ports port 1025-65535  # unregistered ports
acl Safe_ports port 280         # http-mgmt
acl Safe_ports port 488         # gss-http
acl Safe_ports port 591         # filemaker
acl Safe_ports port 777         # multiling http
acl CONNECT method CONNECT

#
# Recommended minimum Access Permission configuration:
#
# Deny requests to certain unsafe ports
http_access deny !Safe_ports

# Deny CONNECT to other than secure SSL ports
http_access deny CONNECT !SSL_ports

# Only allow cachemgr access from localhost
http_access allow localhost manager
http_access deny manager

# We strongly recommend the following be uncommented to protect innocent
# web applications running on the proxy server who think the only
# one who can access services on "localhost" is a local user
#http_access deny to_localhost

#
# INSERT YOUR OWN RULE(S) HERE TO ALLOW ACCESS FROM YOUR CLIENTS
#

# Example rule allowing access from your local networks.
# Adapt localnet in the ACL section to list your (internal) IP networks
# from where browsing should be allowed
http_access allow localnet
http_access allow localhost

# And finally deny all other access to this proxy
# http_access deny all
http_access allow all

# Squid normally listens to port 3128
http_port 3128

# Uncomment and adjust the following to add a disk cache directory.
#cache_dir ufs /var/spool/squid 100 16 256

# Leave coredumps in the first cache dir
coredump_dir /var/spool/squid


#
# Add any of your own refresh_pattern entries above these.
#
refresh_pattern ^ftp:           1440    20%     10080
refresh_pattern ^gopher:        1440    0%      1440
refresh_pattern -i (/cgi-bin/|\?) 0     0%      0
refresh_pattern .               0       20%     4320
[root@worker1 ~]# cat /etc/httpd/conf.d/squid.conf

#
# This is /etc/httpd/conf.d/squid.conf
#

ScriptAlias /Squid/cgi-bin/cachemgr.cgi /usr/lib64/squid/cachemgr.cgi

# Only allow access from localhost by default
<Location /Squid/cgi-bin/cachemgr.cgi>
 Require local
 # Add additional allowed hosts as needed
 # Require host example.com
</Location>
2
3
4
5
6
7
8
9
10
11
12
13
14
15
16
17
18
19
20
21
22
23
24
25
26
27
28
29
30
31
32
33
34
35
36
37
38
39
40
41
42
43
44
45
46
47
48
49
50
51
52
53
54
55
56
57
58
59
60
61
62
63
64
65
66
67
68
69
70
71
72
73
74
75
76
77
78
79
80
81
82
83
84
85
86
87
88
89
# squid配置文件解析
 #
acl all src 0.0.0.0/0.0.0.0          #允许所有IP访问
acl manager proto http              #manager url协议为http
acl localhost src 127.0.0.1/255.255.255.255  #允午本机IP
acl to_localhost dst 127.0.0.1                 #允午目的地址为本机IP
acl CONNECT method CONNECT        #请求方法以CONNECT
#http_access allow all                #允许所有人使用该代理.
#http_reply_access allow all                #允许所有客户端使用该代理

acl Safe_ports port 80          # 允许安全更新的端口为80
acl Safe_ports port 443        #允许安全更新的端口为443

acl localnet src 10.195.249.225     #
acl localnet src 10.195.236.141     #

http_access allow localnet           #
http_access deny !Safe_ports           #


acl OverConnLimit maxconn 16        #限制每个IP最大允许16个连接,防止攻击
http_access deny OverConnLimit

icp_access deny all                        #禁止从邻居服务器缓冲内发送和接收ICP请求.
miss_access allow all                #允许直接更新请求
ident_lookup_access deny all                                #禁止lookup检查DNS
http_port 8080 transparent                                #指定Squid监听浏览器客户请求的端口号。

hierarchy_stoplist cgi-bin ?                #用来强制某些特定的对象不被缓存,主要是处于安全的目的。
acl QUERY urlpath_regex cgi-bin \?
cache deny QUERY

cache_mem 1 GB        #这是一个优化选项,增加该内存值有利于缓存。应该注意的是:
                     #一般来说如果系统有内存,设置该值为(n/)3M。现在是3G 所以这里1G
fqdncache_size 1024        #FQDN 高速缓存大小
maximum_object_size_in_memory 2 MB        #允许最大的文件载入内存

memory_replacement_policy heap LFUDA  #动态使用最小的,移出内存cache
cache_replacement_policy heap LFUDA         #动态使用最小的,移出硬盘cache

cache_dir ufs /home/cache 5000 32 512  #高速缓存目录 ufs 类型 使用的缓冲值最大允午1000MB空间,
#32个一级目录,512个二级目录

max_open_disk_fds 0                                 #允许最大打开文件数量,0 无限制
minimum_object_size 1 KB                         #允午最小文件请求体大小
maximum_object_size 20 MB                 #允午最大文件请求体大小

cache_swap_low 90                            #最小允许使用swap 90%
cache_swap_high 95                            #最多允许使用swap 95%

ipcache_size 2048                                # IP 地址高速缓存大小 2M
ipcache_low 90                                #最小允许ipcache使用swap 90%
ipcache_high 95                                  #最大允许ipcache使用swap 90%


access_log /var/log/squid/access.log squid        #定义日志存放记录
cache_log /var/log/squid/cache.log squid
cache_store_log none                        #禁止store日志

emulate_httpd_log on        #将使Squid仿照Web服务器的格式创建访问记录。如果希望使用
                                #Web访问记录分析程序,就需要设置这个参数。

refresh_pattern . 0 20% 4320 override-expire override-lastmod reload-into-ims ignore-reload   #更新cache规则

acl buggy_server url_regex ^http://.... http://          #只允许http的请求
broken_posts allow buggy_server

acl apache rep_header Server ^Apache                 #允许apache的编码
broken_vary_encoding allow apache

request_entities off                                        #禁止非http的标分准请求,防止攻击
header_access header allow all                        #允许所有的http报头
relaxed_header_parser on                                #不严格分析http报头.
client_lifetime 120 minute                                #最大客户连接时间 120分钟

cache_mgr sky@test.com                        #指定当缓冲出现问题时向缓冲管理者发送告警信息的地址信息。

cache_effective_user squid                        #这里以用户squid的身份Squid服务器
cache_effective_group squid

icp_port 0                       #指定Squid从邻居服务器缓冲内发送和接收ICP请求的端口号。
                     #这里设置为0是因为这里配置Squid为内部Web服务器的加速器,
                     #所以不需要使用邻居服务器的缓冲。0是禁用

# cache_peer 设置允许更新缓存的主机,因是本机所以127.0.0.1
cache_peer 127.0.0.1 parent 80 0 no-query default multicast-responder no-netdb-exchange
cache_peer_domain 127.0.0.1
hostname_aliases 127.0.0.1

error_directory /usr/share/squid/errors/Simplify_Chinese        #定义错误路径

always_direct allow all                # cache丢失或不存在是允许所有请求直接转发到原始服务器
ignore_unknown_nameservers on        #开反DNS查询,当域名地址不相同时候,禁止访问
coredump_dir  /var/log/squid                 #定义dump的目录

max_filedesc 2048                #最大打开的文件描述

half_closed_clients off        #使Squid在当read不再返回数据时立即关闭客户端的连接。
                                #有时read不再返回数据是由于某些客户关闭TCP的发送数据
                                #而仍然保持接收数据。而Squid分辨不出TCP半关闭和完全关闭。

buffered_logs on #若打开选项“buffered_logs”可以稍稍提高加速某些对日志文件的写入,该选项主要是实现优化特性。#
2
3
4
5
6
7
8
9
10
11
12
13
14
15
16
17
18
19
20
21
22
23
24
25
26
27
28
29
30
31
32
33
34
35
36
37
38
39
40
41
42
43
44
45
46
47
48
49
50
51
52
53
54
55
56
57
58
59
60
61
62
63
64
65
66
67
68
69
70
71
72
73
74
75
76
77
78
79
80
81
82
83
84
85
86
87
88
89
90
91
92
93
94
95
96
97
98
99
100
101
此处参考:https://www.cnblogs.com/he-ding/p/10038264.html
# 启动squid服务
service squid start
# 客户端(无外网权限)
vi /etc/profile
 # vi /etc/profile
http_proxy=http://192.168.20.20:3128       # 分别指定http、https、ftp协议使用的代理服务器地址
https_proxy=http://192.168.20.20:3128
ftp_proxy=http://192.168.20.20:3128
no_proxy=192.168.20.        # 访问局域网地址(192.168.20.0/24网段)时不使用代理,可以用逗号分隔多个地址
export http_proxy https_proxy ftp_proxy no_proxy
2
3
4
5
6
保存退出,注销重新登陆系统即可生效